Showing posts with label Coloured pencils. Show all posts

Thursday, 15 September 2016

Old tree with moss and rocks.

Oh dear, such a long time since the last post. This is one I have been working on and recently finished. I so love these old trees covered in moss. This was something of a challenge but I do like a challenge!
Title: I haven't found anything suitable yet
Support: Fabriano Artistico HP 300gsm (my favourite paper)
Media, Prismacolour pencils and Pro Marker blender pen.
Size 14" x 14"
My ref photo taken on Dartmoor last year.


I have been out on the Quantock hills at Fyne Court this morning looking for some more old trees to draw. I'm on a roll and it was such a beautiful day it would have been a shame to waste it.

Tuesday, 3 November 2015

Pat the greyhound

Pat crossed over the rainbow bridge recently and left his family very upset. This picture was commissioned for the husband as a Christmas present and for the family to remember him by.
Size: A4
Paper: Fabrianno Artistco HP
Pencils: Faber Castell Polychromos.

I am safe to post this as they don't really do computers so very unlikely that it will be seen.


Wednesday, 19 November 2014

Cat on Ampersand pastelbord

Ampersand pastelbord is a new support for me. I was given a small piece to try out, and decided to do this long haired cat just to see how much detailing I could get on it. I found it reasonably easy to use, but could definitely not get the level of detail that I can achieve on paper such as Fabrianno artistico HP. Still, I like the finished painting and might use it again. I found I really needed to keep sharpening the pencils as they became blunt very quickly as the surface is quite rough.

Support: Ampersand pastelbord (mid grey)
Pencils: Faber Castell Polychromos
Size: 7" x 5"


Tuesday, 24 September 2013

Bearded Iris

Well, it's been a very long time since I last posted anything here. The summer has been busy.
I started this picture of a beautiful purple Iris some years ago....possibly as long as six and recently I decided that with some adjustments it was worth finishing. I originally had some leaves and other faded buds in it but on reflection decided to turn it into a portrait of the bloom only as it really didn't need any further embellishment. Such a stunning rich colour.

Details
Size: A3
Pencils: A mix of Berol Karismacolour and Prismacolors. The background has been blended using solvent.
Support: Fabrianno Artistico 300gsm


Thursday, 12 July 2012

Tilly

Meet my collie Tilly. She is an old lady now, but refuses to believe it and still enjoys her walks, the longer the better, come rain, shine, snow, hail or anything else nature can throw at us.

When demonstrating at Hestercombe Gardens I decided to use her as my model. (using a photo of course as she would never sit still long enough).

I used Derwent water-soluble pencils on Derwent's new watercolour paper and I can say that I really do like it. It is sturdy and nice and smooth with very little tooth but takes pencil beautifully. It also takes erasing and indenting well and will take fair bit of  bashing about. It will definitely become part of my stable of supports.
Size: A4


Monday, 16 April 2012

Boxer Blaze

This is my latest commission. Her name is Blaze and sadly recently passed over the Rainbow Bridge. Luckily I had a great photo to work from which made my life so much easier, and her owner happy that I could do a good portrait for her.

Please people, if you have a beloved pet, take loads of really good photos while they are in good health, you may not want a painting now but you never know how you will feel when they go.  I have had to turn down a number of commissions because of really terrible photos and it is too late to do anything about it. The disappointment is sad to see.

Measures A4 and is done on maize Pastelmat using coloured pencils and solvent.


Wednesday, 16 November 2011

Christmas present commission

I had to put the meerkats to one side for a few days so I could get on and do Orchid, for a Christmas present.
I have used a very limited pallet, it didn't really call for lots of colour and she looks like a monotone.
Pencils used: Karisma, indigo, goldenrod, burnt umber and a little pumpkin red in the eye.
Paper: Fabrianno Artistico HP
Measures approx, 10" x 8"


Now, back to the meerkats which is almost complete.

Wednesday, 6 July 2011

Looking Back #2

 Here is a small update. Working on bringing up the colours in the shadows and deepening the darks for a bit of oooomph.


 This is my second attempt at this zebra, the first one, done on velour with pastels, is just too dark and gloomy for my taste so thought I would try again, this time with coloured pencils. I have used maize Pastelmat and Polychromo pencils. The background has been dissolved with low odour solvent.
The scan has come out a little yellower that the original, maybe I can adjust that next time. 
Size is about 16" x 12"


Friday, 27 May 2011

LOOK! - over there.

This is the last of my entries for the UKCPS exhibition. Slightly more detailed than the previous two done in this style. I need to keep a grip on my obsession with detail otherwise it gets out of hand.

Size: About A4
Support: Fabrianno Artistico HP (as usual)
Media: Watercolour and salt, Faber Castel Polychromo pencils.


Wednesday, 18 May 2011

Time Out

A quick one, for me. It took me about 5 hours and was a new experience, I was trying to work in a looser style and started out with an abstract in mind, but as usual my love of realism got in the way. But I am happy with how it has turned out.

Size: 18" x 6"
Support: Fabrianno Clasico HP
Medium: Watercolour paint, Faber Castel Polychromos coloured pencils and Derwent water soluble cp.

Wednesday, 4 May 2011

Summer's Faded Beauty

Here is something I have been working on for a long time now. It is of a bloom from the Hydrangea bush in my garden. The photo was taken at the end of last summer when the flowers were past their best. I love the look of the blooms when the colour begins to fade to pale pinks, lilacs and the palest of greens and creams.
Size: 16"x12"
Medium: Karisma pencils with a dark indigo Polychromo pencil used in the shadows.
Support: Fabrianno Artistico HP 300gsm

Tuesday, 22 February 2011

Claudia and Lennie

This is a portrait of my niece Claudia and her little cat Lennie, commissioned by my brother and his wife, who live in the USA. I was a little nervous in taking it on as I haven't done many human portraits before. I have always felt it was more difficult to capture a human likeness than with the animal portraits I specialise in. I was really pleased with the result. I feel I have captured her personality well.


Support: Fabrianno Artistico HP
Pencils: Karisma and Polychromos
Size: 16" x 12"

Sunday, 28 November 2010

Whizz - a handsome black Lab

 Small update, not much done yesterday, a tad cold in my studio.


 A little more done today, putting down the base layers first before adding the details and highlights etc. It's looking a little strange with all the different colours but once I have added more detail on top he will look like a black dog. Hmmm think I need to work on his eye, looks a little odd.


 Well, onto my next commission, a very handsome black labradour.

It is on Pastelmatt, A3 in size and I am using a variety of soft coloured pencils, mostly Karisma, a few Derwent coloursoft and one or two Stabilo softcolour (I think these have been discontinued - a shame as they are nice to use). I am then dissolving the cp using a low odour solvent. This is the first time I have done an animal using this method and I will be interested to see how it turns out. I really hope I don't have to start again as this is for Christmas, so not much time left.


Thursday, 25 November 2010

Rose and Tango finished

Finally finished Rose and Tango. All in all it took me around 20 hours to do. I hope Rose likes it!

Monday, 15 November 2010

Rose and Tango

I think this will be the last post until I have finished. Just Tango's head and the background to do now. I am leaving the head for tomorrow morning when I am fresh....I will need to concentrate for the bits and bridle.


 A little more done, not too much more to do, just the most dificult part, the bridle and bits etc, I will need a very, very sharp pencil to get nice crisp lines. I think that part will take a fair amount of time. I am looking forward to doing the head though.


A small update....not too much to show for 3 hours work, I spent most of it adding  more detail, veins and muscles and layering in darker tones etc.


At last I have something to post. It's been way too long since I last had a pencil in my hand.

This is a commission for a friend, Rose and her and her beautiful horse Tango, bought by a group of her friends for her birthday. (The portrait, not the horse.)
The photo was taken by her partner Jon.  http://www.jonsucksmithphotography.co.uk/index.html

It measures roughly 16" x 12". 
Pencils: Faber Castell Polychromos
Support: Fabrianno Artistico HP.

Around 5 hours of work so far. The scan is not great, but the colours are fairly accurate.


Friday, 14 May 2010

Third Little Bird

Well, I finally got around to finishing the third in my set of little birds. They are very small but do look nice in their frames. I will take a photo of them framed when the light is better and post it. I decided to scrap the kingfisher I was going to do and settled on a little blue tit. I do love these cheeky little chaps.

Friday, 7 May 2010

Silverback Gorilla

I have just completed this wonderful boy. He is a large silverback who lives at Bristol Zoo. He was so laid back and relaxed it was easy to take a good photograph of him as he sat in the sun surveying his space. I  wondered if he was thinking of his natural habitat, the rainforest of the Congo? With this in mind, I titled it 'Rainforest Dreamin'. 
It will be one of my entries into the UKCPS annual exhibition.

Size: 13" x 13"
Support: Fabrianno Artistico
Medium: Derwent's new watersoluble coloured pencils.

I think there must be at least 5 million pencil strokes for the fur...just guessing, I didn't count, but it sure felt like it. LOL

Monday, 15 February 2010

Spotted - Amur Leopard

Over the last month I have been working on this beautiful Amur Leopard. I was very lucky to get this shot of him in the only patch of sunlight there was in his enclosure. He lives at Cricket St Thomas Wildlife park, (I have just read that in fact the leopards will be going from here as will all the other large animals, sad as this was a good place for me to get reference photos for my art). I had no idea that this species of Leopard is so critically endangered. There are only 32 animals alive in the wild and 200 in captivity, where their gene pool is getting dangerously small.

The picture is A3 in size and I used mostly Faber-Castell Polychromos pencils with a few of the old Karisma pencils. The support is Clairefontaine Pastelmat in pale yellow.


Wednesday, 30 December 2009

Rhino in watersoluble coloured pencil.

Over the holidays I have been taking some time out to draw something for myself and decided to try out some of Derwent's new watersoluble pencils I bought at the NEC in November. I am surprised to find I really like them, up to now I have not liked watersolubles, but these work well.


First I lay down a very light layer of dry colour pencil, and then dissolved the colour using one of those water brush thingys....stops me flooding everything with water as I usually do. This is the early stage.


Then I worked over this base colour using dry pencil , building up tone and colour and adding in the wrinkles and skin textures. Here I am almost complete. I am hoping to finish it later today and will post the results.


Thursday, 3 December 2009

Ring-tailed Lemurs in Coloured Pencil 38 x 15cm

This WIP was commissioned by a well known magazine. Disappointingly, due to a change of Editor it will now not be used. So I post it on my blog for you to see how I produce a detailed coloured pencil painting of a couple of ring-tailed lemurs. Enjoy!

Drawing animals with coloured pencil is challenging but very rewarding, and allows the artist to achieve high levels of detail and realism. Patience is required to develop the texture and colour of fur which is essential for capturing the essence and character of the animals you are depicting; whether you are drawing your own pets or the more exotic species from around the world.


My tools and materials
Fabrianno Artistico hp paper 300gsm
Faber-Castell Polychromos and Berol Karisma coloured pencils
Derwent embossing tool
Blu Tack
3B graphite pencil

Scalpel for sharpening pencils. It is important to keep a sharp point on your pencils when drawing fur.


Stage 1: Indenting
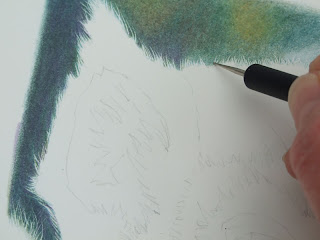


After transferring a fairly detailed pencil sketch of my subjects onto my paper and before laying down any colour, I use the embossing tool to indent what will be the longer soft fur around the ears and the shorter fur across the top of the lemur’s heads, which I want to keep a crisp white against what will be a dark green background. I find indenting is an easier method to establish white hair against dark than negative drawing. I start on the background first. Using indigo, yellow ochre and three greens, deep cobalt green, chrome oxide green and permanent green olive, I layer the colours to get a dappled leafy feel. I don’t want any pencil marks showing and use a circular motion, never pressing too hard, layering the colours until all the white paper is covered. The lines which were indented into the paper will stay white.


Stage 2: Laying down colour


Now the fun part begins. I always work from left to right and keep a sheet of clean white paper to rest my hand on, which stops me smudging the outline sketch of the subject, or getting the natural oils from my hand onto the paper, which can effect the way coloured pencil ‘takes’ to the paper.

For the texture of the shorter fur on the top of the head, I ‘flick’ the pencil in short strokes in an upward movement, using different colours placed next to each other, building up the marks to get the thickness of the fur. Vary the direction of these strokes a little throughout the area to avoid a regimented look to the fur, and use more strokes in areas which are darker or in shadow. I use the white of the paper between the coloured strokes to suggest light reflecting off each hair. Fur often appears to be made up of many different colours and here I used mauve, indigo, grey and a lovely dark reddish brown called caput mortuum.

The inner ear of these animals is very dark and again, before using any colour, I have indented a few curved lines which will show the fine white hair overlapping the black skin. After completing the ear I used Blu Tack pinched to a sharp edge to lift out more soft hair from the black inner ear. Using Blue tack to lift colour is an excellent way of lightening areas which you may have overworked, or where you need a lighter area.


Progress made.


Stage 3. Working on the eyes
.

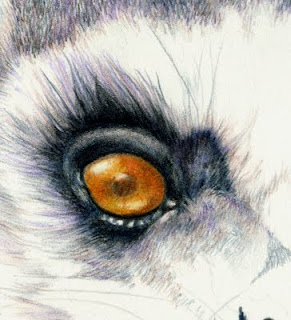
Moving on to the eyes. It’s important to get the eyes correct, as mistakes here can ruin your picture. I want to get the wet, glassy look of the eye and so I keep in mind that it is essentially a round object, like a marble. If the light comes in from above the subject it will often cause a lightening of colour at the bottom of the iris and will also create a clearer highlight towards the top of the iris. If a flash has been used when photographing the subject, the highlight will be small and crisp, and I would suggest that you change this in your drawing to something softer to create realism. Studying images of animal eyes will soon help you get to grips with them.

I start by laying down the lightest colour, yellow ochre, all over the iris, but make sure I leave the area where I want the highlight to be. Over the yellow ochre I layer venetian red, burnt sienna and pumpkin orange; once again leaving the highlight white. I darken the area around the very edge of the iris using walnut brown to create the rounded shape of the eye and then lift some of the colour from a small area at the bottom of the eye using Blu Tack, which creates a secondary slightly darker highlight. I soften the edges of the bright upper highlight and finally darken the pupil with a dark brown and a little black. Moving on to the skin immediately around the eye, I use indigo, caput mortuum and black, with smooth strokes of colour. Again I lift out some of the colour to create shape and form.

I can now move on to the nose and mouth. Using mostly indigo with a small amount of caput mortuum and mauve and carefully following the contours of the nose and muzzle using smooth layers of colours, I gradually build up the darker tones as I go, adding a little black inside the nostrils. Always follow the natural curves of muscle and bone structure of the animal with your pencil strokes to get a believable look, obvious pencil marks running against the underlying structure will ruin all your hard work.


A close up view of the eye.

Stage 4: Ring-tailed lemurs completed

After completing the eyes, nose and mouth, I continue putting on colour using very short strokes for the fur on the faces and work around the drawing until I feel that I have gone as far as I can then I put the drawing aside for a day or two. Coming back to it later and looking at it with a critical eye, I see there are some small final adjustments and tweaks that need doing. In this case I darken some of the shadows under the lemur’s chins to add definition and depth. I add a little more texture to the fur under the eyes and some more colour to the tail fur (bottom right corner) making the fur a little more realistic. Last of all I carefully add the whiskers.


The Completed painting.

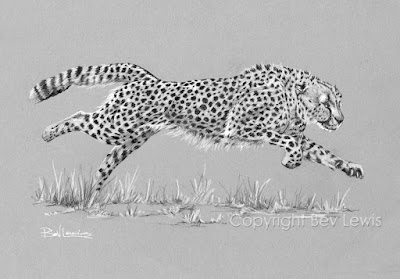
Pencil on toned paper

Here are a couple of experiments using graphite pencil and white coloured pencil, plus a touch of white gel pen on grey paper. I am reasona...