This WIP was commissioned by a well known magazine. Disappointingly, due to a change of Editor it will now not be used. So I post it on my blog for you to see how I produce a detailed coloured pencil painting of a couple of ring-tailed lemurs. Enjoy!
Drawing animals with coloured pencil is challenging but very rewarding, and allows the artist to achieve high levels of detail and realism. Patience is required to develop the texture and colour of fur which is essential for capturing the essence and character of the animals you are depicting; whether you are drawing your own pets or the more exotic species from around the world.
My tools and materials
Fabrianno Artistico hp paper 300gsm
Faber-Castell Polychromos and Berol Karisma coloured pencils
Derwent embossing tool
Blu Tack
3B graphite pencil
Scalpel for sharpening pencils. It is important to keep a sharp point on your pencils when drawing fur.
Stage 1: Indenting
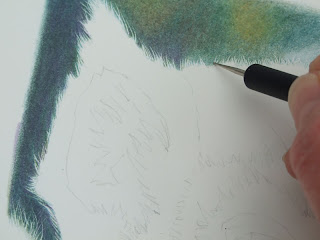
After transferring a fairly detailed pencil sketch of my subjects onto my paper and before laying down any colour, I use the embossing tool to indent what will be the longer soft fur around the ears and the shorter fur across the top of the lemur’s heads, which I want to keep a crisp white against what will be a dark green background. I find indenting is an easier method to establish white hair against dark than negative drawing. I start on the background first. Using indigo, yellow ochre and three greens, deep cobalt green, chrome oxide green and permanent green olive, I layer the colours to get a dappled leafy feel. I don’t want any pencil marks showing and use a circular motion, never pressing too hard, layering the colours until all the white paper is covered. The lines which were indented into the paper will stay white.
Stage 2: Laying down colour
Now the fun part begins. I always work from left to right and keep a sheet of clean white paper to rest my hand on, which stops me smudging the outline sketch of the subject, or getting the natural oils from my hand onto the paper, which can effect the way coloured pencil ‘takes’ to the paper.
For the texture of the shorter fur on the top of the head, I ‘flick’ the pencil in short strokes in an upward movement, using different colours placed next to each other, building up the marks to get the thickness of the fur. Vary the direction of these strokes a little throughout the area to avoid a regimented look to the fur, and use more strokes in areas which are darker or in shadow. I use the white of the paper between the coloured strokes to suggest light reflecting off each hair. Fur often appears to be made up of many different colours and here I used mauve, indigo, grey and a lovely dark reddish brown called caput mortuum.
The inner ear of these animals is very dark and again, before using any colour, I have indented a few curved lines which will show the fine white hair overlapping the black skin. After completing the ear I used Blu Tack pinched to a sharp edge to lift out more soft hair from the black inner ear. Using Blue tack to lift colour is an excellent way of lightening areas which you may have overworked, or where you need a lighter area.

Progress made.

Stage 3. Working on the eyes.
Moving on to the eyes. It’s important to get the eyes correct, as mistakes here can ruin your picture. I want to get the wet, glassy look of the eye and so I keep in mind that it is essentially a round object, like a marble. If the light comes in from above the subject it will often cause a lightening of colour at the bottom of the iris and will also create a clearer highlight towards the top of the iris. If a flash has been used when photographing the subject, the highlight will be small and crisp, and I would suggest that you change this in your drawing to something softer to create realism. Studying images of animal eyes will soon help you get to grips with them.
I start by laying down the lightest colour, yellow ochre, all over the iris, but make sure I leave the area where I want the highlight to be. Over the yellow ochre I layer venetian red, burnt sienna and pumpkin orange; once again leaving the highlight white. I darken the area around the very edge of the iris using walnut brown to create the rounded shape of the eye and then lift some of the colour from a small area at the bottom of the eye using Blu Tack, which creates a secondary slightly darker highlight. I soften the edges of the bright upper highlight and finally darken the pupil with a dark brown and a little black. Moving on to the skin immediately around the eye, I use indigo, caput mortuum and black, with smooth strokes of colour. Again I lift out some of the colour to create shape and form.
I can now move on to the nose and mouth. Using mostly indigo with a small amount of caput mortuum and mauve and carefully following the contours of the nose and muzzle using smooth layers of colours, I gradually build up the darker tones as I go, adding a little black inside the nostrils. Always follow the natural curves of muscle and bone structure of the animal with your pencil strokes to get a believable look, obvious pencil marks running against the underlying structure will ruin all your hard work.

A close up view of the eye.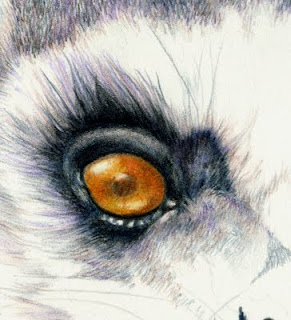
Stage 4: Ring-tailed lemurs completed
After completing the eyes, nose and mouth, I continue putting on colour using very short strokes for the fur on the faces and work around the drawing until I feel that I have gone as far as I can then I put the drawing aside for a day or two. Coming back to it later and looking at it with a critical eye, I see there are some small final adjustments and tweaks that need doing. In this case I darken some of the shadows under the lemur’s chins to add definition and depth. I add a little more texture to the fur under the eyes and some more colour to the tail fur (bottom right corner) making the fur a little more realistic. Last of all I carefully add the whiskers.

The Completed painting.